You do not always have to drop in at the beauty salon or nail art parlor to get the perfect manicure. For those of you who do not know how to apply nail polish – it is not the toughest job, a few simple steps are all it takes to put nail polish like a professional.
You just need a few basic equipments to polish nails. These include cotton balls, nail polish remover, hand and nail cream, emery board or nail file, q-tips, a manicure set, your choice of nail polish as well as clear base and top polish.
If you do not have any of these little tools, don’t be disheartened. You can buy all of them easily at the local store. They do not cost a lot and can be used repeatedly, so it will be a value for money purchase.
Once you have all the necessary items you can get started with the nail polishing process.
How to apply nail polish in 8 easy steps
 How to apply nail polish
Remove old nail polish:
You should begin by removing all traces of old nail polish. Put some nail polish remover on a cotton ball and press against the nail for a second then rub off the existing nail polish. If the nails have not been polished previously then, of course, you do not have to follow this step.
Clean your hands:
The nails have to be made ready prior to applying nail polish. This is to ensure that your nail are adequately prepared to be polished, the polish stays put for a longer period of time and also the nails do not crack, chip or become overtly brittle. After all traces of the nail polish have been removed, you should clean your hands. Soak your hands in a bowl/container of warm soapy water for 5-10 minutes. This will soften the nails and cuticles. It will also clean away the nail remover residue and remove dead skin. Once you are done soaking, gently wipe off the water with a towel and slather on the hand and nail cream lavishly.
Remove cuticles:
Next you have to take care of the cuticles. You will find a cuticle remover and stick in the manicure set. Soften the cuticles with the cuticle remover and then gently push them back with the cuticle stick.
Trim, shape and buff the nails:
Once you are done with the cuticles, you need to trim, shape and buff your nails. Start by trimming your nails with the help of a nail cutter, you will find it in your manicure set. Next, you have to begin by shaping the nails. This is to be done with the help of the emery board or nail file – whichever you find easier to work with. Before you start work on shaping your nails, you have to decide what shape you want –round, pointed, square, oval or squoval and accordingly you can work on it. The file/board should be worked gently in one direction, from side to side to achieve the desired style. After shaping the nails in the shape you want, you have to adequately buff your nails. You will find the buffer, too, in the manicure set. Work the buffer gently on the surface of the nails. This will remove irregular, uneven surfaces and ridges. Buffing makes the nails smooth. Once you are done with shaping the nails, they are ready to be polished.
Apply base coat:
Base coat is also known as nail gloss as it helps to achieve a glossy look and will make the nails sparkle. You should apply a thin coat. It will also ensure that the nail polish goes through evenly and smoothly.
Prepare the nail polish bottle:
Roll the nail polish bottle gently between your two palms so that the polish is mixed thoroughly. However, do not shake the bottle as it will create air bubbles and the polish will become thicker. As a result, you won’t be able to get the desired result of a smooth polish and the shelf life of the nail polish will also be reduced.
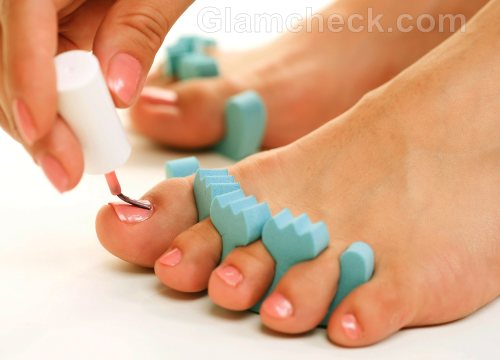
Apply the nail polish:
Place your hands on a table if they are unsteady, otherwise they will shake unnecessarily and ruin the application. Also, see that you start from the smallest finger and progress to the thumb instead of the other way around. Open the nail polish bottle and wipe off the excess nail polish dripping down from the brush – on the side of the bottle. Apply a stripe of the color on the middle of your nail from the base to the tip. Follow it up by putting the polish on the left side and the right side of the center stripe.
Starting from the center ensures that excess color won’t pool around the corners.Put the nail polish on all the fingers this way. Once you are done with the first coat and it has dried considerably, you can start on the second coat, in the same way like the first, and restrict it to two coats. Ensure that the entire area of each nail is covered by the second coat of polish. Applying more coats will make the polish thicker and make it prone to air bubbles, as a result neither will your nail polish dry quickly nor will you achieve a smooth polish. Too many coats also lead to more and faster chipping of the polish. Wipe away any excess nail polish at the corner with a q-tip.
Apply top coat to the nail polish:
Finish of the procedure by applying clear top coat. This will make the nail polish look shinier. It will also prevent the nail polish from cracking and help it to last longer.
Wait a few minutes for your nails to dry. If you are in a hurry then you can dip your fingers in a bowl of ice cold water. This dries the nail polish faster. However, it is best to wait and let them air dry for achieving the best effect.
Once the nails have dried, it will look like a professional job. So, go ahead, flaunt those nails and give tips to your friends on how to apply nail polish like a pro – but do remember you learnt how to do it like a professional from us!
Image: Shutterstock